Showing posts with label Windows 7. Show all posts

Saturday, September 20, 2014

Problem opening an image with alpha transparent channel

There might be situations that you might be opening up a png file that was created by someone else and you have to edit it. So here's the question, how can you workaround the problem?

You have a png like the above.

Outcome when you open it using Photoshop.
There's a strange black border around the image.

So here's a workaround for it.

First click here to open up 'Photo editor online - Pixlr.com'.

Reopen and save the image as a new file.

This would be the new file that I have created using "Pixlr.com".

Now, when you open it using Photoshop, you won't be getting anymore
unnecessary black color border. :D Case closed. Happy Days...

* Click here for the official website of 'Pixlr.com'.

Friday, July 11, 2014

Devices in the same network...

Well, though you might not be doing this frequently, but there might be instance where you might need to scan through the whole network looking for the IP Address of a particular device.

I have tried entering the command 'arp -a' in command prompt, but
the results ain't as good as the following...

(Logo taken from 'SoftPerfect Research' website.)

'SoftPerfect Network Scanner'
As compared to the command 'arp -a', this produces a much more
detail results and though there's the troublesome step that requires
you to enter the range of ip that you are scanning, but the results
are far more cleaner and better than the 'arp -a' command. :)

Screengrabs of the software 'SoftPerfect Network Scanner'

* Click here to download the software 'SoftPerfect Network Scanner'.
^ Click here to find out more about 'SoftPerfect'.

Wednesday, February 12, 2014

Managing plugin detection on IE11

If you have been creating and managing various type of contents online, you might want to take note of the change on IE11. It seems that in order to make the life of the developers much more easier, IE11 now supports the javascript code "navigator.plugins". However, it seems that this doesn't really return the desired outcome. I have run the script on IE11 and it only returns 'Microsoft Silverlight', whereby my Chrome and Firefox has much more results. (Ex: Flash, Quicktime, etc...) Therefore if you are detecting browser plugins, you should still check for ActiveXObject first followed by "navigator.plugins". But looking on the bright side, seems that Microsoft is trying to make everyone's life much more easier which is a (+). However, it looks like they have to spend a bit more time improving it.

* Click here to check the results of "navigator.plugins" on your browser.
^ Click here for the changes that Internet Explorer 11 has.

Friday, October 4, 2013

Renaming your recursive files and folder using a batch file.

Initially I was using a 3rd party software to do all the renaming work. But as I proceed, I ended up searching high and low for a method using a batch file (*.bat) to do all the tedious work. Therefore, after playing and modifying the code, I have ended up with this.

@echo off
setlocal enabledelayedexpansion
REM for renaming of recursive folders, sub folders
for /d /r %%f in (*.*) do (
set fn=%%~nxf

REM replace all the . with __ in the folder names (excludes extensions)
if not [!fn!]==[] ( 
if not ["%%~nxf"]==["!fn:.=__!"] ( 
echo ren "%%~f" "!fn:.=__!" 
ren "%%~f" "!fn:.=__!" 
)
)
REM replace all the -interface with nothing in the folder names
REM (excludes extensions) add a I in front of the folder name
if not [!fn!]==[] ( 
if not ["%%~nxf"]==["!fn:-interface=!"] ( 
echo ren "%%~f" "I!fn:-interface=!" 
ren "%%~f" "I!fn:-interface=!" 
)
)
)

REM for renaming of recursive files
for /r %%f in (*.*) do (
set fn=%%~nf

REM replace all the - with __ in the file names (excludes extensions)
if not [!fn!]==[] ( 
if not ["%%~nxf"]==["!fn:-=__!%%~xf"] ( 
echo ren "%%~f" "!fn:-=__!%%~xf" 
ren "%%~f" "!fn:-=__!%%~xf" 
)
)
REM replace all the -interface with nothing in the file names
REM (excludes extensions) add a I in front of the file name
if not [!fn!]==[] ( 
if not ["%%~nxf"]==["!fn:-interface=!%%~xf"] ( 
echo ren "%%~f" "I!fn:-interface=!%%~xf" 
ren "%%~f" "I!fn:-interface=!%%~xf" 
)
)
)
pause

* Click here to download the batch file that I have listed in this posted.
^ Click here to find out more about batch files in Windows.
~ Click here to find out the difference between %% and !! in a batch file.

Thursday, September 26, 2013

Windows: Create a automated action...

Not all software out there allows you to save a series of commands/actions and allows you to run them again without the need of opening the software. Even if it can allow you to do that using command prompt, not all the functionalities will not be provided to you. Luckily there are software like...

'AutoHotkey'
You can script the actions that you would like to perform in a particular
software. On top of that, you can generate the script into a normal
windows executable(.exe) file that allows you to share it with normal
Windows User.

However, I knew that there are numerous software out there that can provide
you with a GUI interface and record all the necessary steps that you would
like to perform over and over again. Ex: winautomation, Do It Again,
RoboTask, etc... But most of them requires a license, and since I'm
performing a easy task, therefore I would rather spend a bit of time
scripting the actions rather than paying for a license.

* Click here to find out more about 'AutoHotkey'.

Sunday, September 8, 2013

Kaomoji

Have you used the Japanese Kaomoji(face characters) before? Do you like it? However, if you are going to copy and paste each and every one of them, that's going to be pretty troublesome. But, if you have a Windows PC, you can actually configure it and it is definitely much more faster than the usual Copy and Pasting method. (You can also apply it to a Mac PC, but I don't own one now.)

1) First of all, you will have to download the file over here.

2) You will have to change to the 「Microsoft Japanese IME」 keyboard.

3) Click on the triangular button, follow by the step
of clicking on the 「Show the Language bar」 button.

4) After that, click on the 「Tools」 button, follow by
the step of clicking on the「Dictionary Tool」 button.

5) This will open up the 「Microsoft IME Dictionary Tool」 software.

6) Click on the 「Tool」 button, follow by the step
of clicking on the 「Import from Text File...」 button.

7) Select the file,「kaomoji.txt」, that you have downloaded earlier.

8) Click on the 「Exit」 button, after all the data have been imported successfully.

Congratulations!!!
You have imported all the data successfully.
From today onwards, while typing the Japanese characters 「いい」(Good) using
the 「Microsoft Japanese IME」 keyboard, all sorts of Japanese Kaomoji(face
characters) options will be given to you too. Isn't that great? :D

Friday, September 6, 2013

Beyond Notepad

Since I have been doing a lot of multitasking at my workplace every now and then, therefore opening 10 different notepad applications isn't going to help much. Luckily, there are several options out there that allow us to open multiple text files at 1 go. (I, myself have tried 'TextMate'(Mac), 'e-TextEditor'(Windows), 'Notepad++'(Windows), etc...)

Image taken from 'Notepad++'.
As for now, I think 'Notepad++' itself is strong enough to replace your default
'Notepad' application in Windows. Not only the performance of the application is
very good, it also allows you to open/edit/search through multiple files at one
go. On top of that, it's free and it also supports formatting for some of the
much more common programming languages(HTML, XML, Javascript, etc...).
(However, it would be great if I can also perform a Alt-Tab between the documents
opened using 'Notepad++'. :P)

* Click here to find out more about 'Notepad++'.

Thursday, July 18, 2013

One of Windows OS missing component - Rename Multiple Filenames

Sometimes renaming a list of files can be pretty annoying and it gets more and more frustrating when there are a lot of files. And this can be pretty disturbing to the type of people that prefer to rename their filename with something meaningful. Therefore you can consider the following softwares.

  • A.F.5
    • I'm using this in the office. Basically, the interface of this software is pretty simple and although it doesn't come with a lot of features, but it is already more than enough.
  • Bulk Rename Utility
    • As I was browsing through blogs, discussion boards, etc, this seems to be one of the hottest alternative. It can even support filename replacement using Regular Expressions. However, the interface looks kinda squeezy to me. =.=

Friday, July 12, 2013

Creating a custom Service

Well, basically if you are using a Windows server or you are doing a lot of development work, you might be running a lot of services locally. (Ex: Apache, WAMP, etc...) Imagine how much time you can save by creating a Service that will start these programs automatically.

Steps for creating a new Windows Service
Before moving on any further, you will need to grab hold of these 2 files first.
They are instsrv.exe and srvany.exe.

Click here to download the files now.
Click here to download the original package from Microsoft.
(If you are using the package from Microsoft,
you will need to extract the files from the package.)

Step 1 - Open up the Windows Start menu, enter cmd into the
Search programs and files field, Right-Click on the program
cmd.exe and select Run as Administrator.

Step 2 - Enter the following into the Command Prompt window.

"{yourPath}\instsrv.exe" {name} "{yourPath}\srvany.exe"
Replace {yourPath} with the directory that has the files instsrv.exe and srvany.exe.
Replace {name} with the Name of the new Service that you are going to create.

And there you go, you have successfully created a new Empty Service.

Step 3 - Open up the Windows Start menu, enter regedit into the
Search programs and files field and run the program regedit.exe.

Step 4 - Look for the new Service under the following directory.

HKEY_LOCAL_MACHINE\SYSTEM\CurrentControlSet\Services\{name}
Replace {name} with the Name of the new Service that you have created.

Step 5 - After selecting the new Service that you have created, Right-Click and
create a new Key. Rename the new Key as Parameters

Step 6 - Under Parameters add a few new String Value.

Step 7 - Entering some values
NameTypeData
ApplicationREG_SZ{the full path of your application}
Ex: G:\service\run_notepad.bat
AppDirectoryREG_SZ{the path to your application}
Ex: G:\service\

Step 8 - Open up the Windows Start menu, enter services into the
Search programs and files field and run the program Services.

Step 9 - Locate and open up the new Service that you have created.

Step 10 - You can set the Startup Type to either Automatic or
Automatic (Delayed start). (Automatic will start the Service
when Windows boots up. Automatic (Delayed start) will start 2 minutes
after the last Automatic Service has been executed.)

On top of that, some programs will only run smoothly with a particular user
account. That's where the Log On tab comes in. You can specify the
User Account Credentials that you are going to use when you run this Service.

Step Remove - To remove a Service,
type the following command in Command Prompt window.

"{yourPath}\instsrv.exe" {name} REMOVE
Replace {yourPath} with the directory that has the file instsrv.exe.
Replace {name} with the Name of the Service that you are going to delete.

And there you go, you have successfully removed a Service.

Wednesday, June 19, 2013

Using Multiple Speakers in Windows 7

I have finally move from Windows XP to Windows 7. When I was installing all the individual software and hardware devices into the new system, I realized that on Windows 7, you can only use 1 particular playback device at any point of time. Therefore here's a solution for you if you are using a set of speakers and at the same time, you are also using a TV/monitor that comes with a set of speakers.

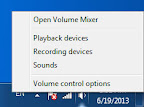
Right-click the sound icon at the bottom right of your screen.
Select the option 'Playback devices'.

Make sure that your 'Speakers' were 'Set as Default Device'
and enabled. (Note the device '227E4QH-1' is my monitor that comes with speakers.)

Go to the 'Recording' tab and show the right-click menu and ensure that the
options 'Show Disabled Devices' and 'Show Disconnected Devices' are selected.

Double-Click the device 'Stereo Mix' and go to the 'Listen' tab.
Change the dropdown menu for 'Playback through this device:' to your monitor.
(As for my case, I will change it to '227E4QH-1'.) Apply all changes and you
are done. Start playing some videos to test out the audio settings. :D

Monday, January 2, 2012

A stupid font settings of Windows 7

Have you encounter the problem of starting up your Windows 7 and realised that all your Chinese or Korean or Japanese characters have turned into square boxes like the following, []? I have encounter it before and today I am going to share a possible fix for it.

Here are the steps:
  1. Click on the 'Start' button on the bottom left of the screen
  2. Click on 'Control Panel'
  3. Click on 'Appearance and Personalization'
  4. Click on 'Fonts'
  5. In the left pane, click on 'Font settings'
  6. Click on 'Control Panel'
  7. Make sure that the 'Hide fonts based on language settings' check box is not selected
  8. Restart your Laptop or PC and you are done.

* Click here to find out more.