Friday, June 28, 2013

Flex: Playing with DataTip of a Chart

Not sure if any of you out there have been playing or using charts in Flex, but I have come across this simple looking problem the other day. The problem would be the border around the DataTip needs to be much more thicker. Although it might appear to be pretty easy, but it ended up to be a much more sophisticated problem.

Here's the source code of my main application - SimpleDataTipBorder.mxml
<?xml version="1.0" encoding="utf-8"?>
<s:Application xmlns:fx="http://ns.adobe.com/mxml/2009" 
      xmlns:s="library://ns.adobe.com/flex/spark" 
      xmlns:mx="library://ns.adobe.com/flex/mx"
      creationComplete="creationCompleteEvent(event)">
 <fx:Declarations>
  <!-- We are specifying the effect for the pie chart here. -->
  <mx:SeriesInterpolate id="selectEffect" 
         easingFunction="{Elastic.easeOut}"
         duration="1000" 
         effectEnd="effectEndEvent(event)"/>
 </fx:Declarations>
 <fx:Script>
  <![CDATA[
   import mx.charts.HitData;
   import mx.charts.events.ChartItemEvent;
   import mx.charts.series.items.PieSeriesItem;
   import mx.collections.ArrayCollection;
   import mx.effects.easing.Elastic;
   import mx.events.EffectEvent;
   import mx.events.FlexEvent;
   
   //Here's our data for the pie chart.
   [Bindable]
   public var expenses:ArrayCollection = new ArrayCollection([
    {Expense:"Taxes", Amount:2000},
    {Expense:"Rent", Amount:1000},
    {Expense:"Bills", Amount:100},
    {Expense:"Car", Amount:450},
    {Expense:"Gas", Amount:100},
    {Expense:"Food", Amount:200}
   ]);
   
   //A timer to reset the datatip after 1 sec.
   private var chartTimer:Timer = null;
   
   // Create a Array of explode radii.
   public var explodingArray:Array = [];
    
   protected function creationCompleteEvent(event:FlexEvent):void
   {
    //set the datatip renderer of the pie chart to the
    //custom datatip
    pie.setStyle("dataTipRenderer", CustomDataTip);
   }
   
   //Upon clicking on the pie chart, the selected chart item will
   //be explode from the pie chart.
   protected function pie_itemClickHandler(event:ChartItemEvent):void
   {
    var tempArray:Array = [];
    tempArray[event.hitData.id] = 0.2;
    pieSeries.perWedgeExplodeRadius = tempArray;
    
    //hide the datatip of the pie chart when it animates.
    pie.showDataTips = false;
    
    //refresh the data, which is needed to enforce the animation
    expenses.refresh();
   }
   
   //Show the datatip again after all the animations. This is
   //because if you enable the display of dataip of the chart
   //immediately, the color of the datatip will be wrong.
   protected function effectEndEvent(event:EffectEvent):void
   {
    if(chartTimer)
    {
     chartTimer.stop();
    }
    chartTimer = new Timer(1000,1);
    chartTimer.addEventListener(TimerEvent.TIMER, chartTimerEvent);
    chartTimer.start();
   }
   
   private function chartTimerEvent(event:Event):void
   {
    pie.showDataTips = true;
   }
   
  ]]>
 </fx:Script>
 <s:BorderContainer width="100%"
        height="100%">
  <s:VGroup verticalAlign="middle" 
      horizontalAlign="center"
      width="100%"
      height="100%">
   <s:VGroup>
    <mx:PieChart id="pie" 
        dataProvider="{expenses}"
        itemClick="pie_itemClickHandler(event)"
        showDataTips="true">
     <mx:series>
      <!--Apply the Array of radii to the PieSeries.-->
      <mx:PieSeries id="pieSeries"
           field="Amount" 
           nameField="Expense"  
           showDataEffect="selectEffect"
           labelPosition="callout"/>
     </mx:series>
    </mx:PieChart>
   </s:VGroup>   
  </s:VGroup>
 </s:BorderContainer>
</s:Application>
Here's the source code of my custom DataTip Class - CustomDataTip.as
package
{
 import flash.display.Graphics;
 import flash.geom.Rectangle;
 
 import mx.charts.chartClasses.DataTip;
 import mx.charts.chartClasses.GraphicsUtilities;
 import mx.graphics.IFill;
 import mx.graphics.SolidColor;
 import mx.graphics.SolidColorStroke;
 import mx.graphics.Stroke;
 
 public class CustomDataTip extends DataTip
 {
  public function CustomDataTip()
  {
   super();
  }
  
  //We are overwriting the updateDisplayList of the
  //datatip.
  override protected function updateDisplayList(w:Number,
               h:Number):void
  {
   super.updateDisplayList(w, h);
   
   var g:Graphics = graphics;
   g.clear();
   
   var xpos:Number = 0;
   var ypos:Number = 0;

   g.moveTo(measuredWidth, 2);
   var _shadowFill:IFill = 
    IFill(new SolidColor(0xAAAAAA, 0.55));
   _shadowFill.begin(g,
    new Rectangle(xpos, ypos, 
     measuredWidth, measuredHeight),null);
   g.lineTo(measuredWidth + 2, 2);
   g.lineTo(measuredWidth + 2, measuredHeight + 2);
   g.lineTo(2,measuredHeight + 2);
   g.lineTo(2,measuredHeight);
   g.lineTo(measuredWidth - 2, measuredHeight - 2);
   g.lineTo(measuredWidth - 2, 2);
   _shadowFill.end(g);
   
   var fill:IFill = IFill(
    new SolidColor(getStyle("backgroundColor"), 0.8));
   
   //You will specify the thickness of the border of the
   //data tip over here.
   
   //For older version of Flex use this
   //var stroke:Stroke = new Stroke(data.contextColor, 4, 1);
   //instead of this
   var stroke:SolidColorStroke = 
    new SolidColorStroke(data.contextColor, 4, 1);
   
   GraphicsUtilities.fillRect(g, xpos, ypos, measuredWidth,
    measuredHeight, fill, stroke);
  }  
 }
}
* Click here for the demo shown in this post.
^ Click here for the source files for the demo.

Wednesday, June 19, 2013

Using Multiple Speakers in Windows 7

I have finally move from Windows XP to Windows 7. When I was installing all the individual software and hardware devices into the new system, I realized that on Windows 7, you can only use 1 particular playback device at any point of time. Therefore here's a solution for you if you are using a set of speakers and at the same time, you are also using a TV/monitor that comes with a set of speakers.

Right-click the sound icon at the bottom right of your screen.
Select the option 'Playback devices'.

Make sure that your 'Speakers' were 'Set as Default Device'
and enabled. (Note the device '227E4QH-1' is my monitor that comes with speakers.)

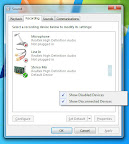
Go to the 'Recording' tab and show the right-click menu and ensure that the
options 'Show Disabled Devices' and 'Show Disconnected Devices' are selected.

Double-Click the device 'Stereo Mix' and go to the 'Listen' tab.
Change the dropdown menu for 'Playback through this device:' to your monitor.
(As for my case, I will change it to '227E4QH-1'.) Apply all changes and you
are done. Start playing some videos to test out the audio settings. :D

Thursday, June 13, 2013

HTML: Background Colour with Opacity

Well, I was working the other day and one of my colleagues told me that the div that has a background colour with an opacity of 70 doesn't work in IE. After a bit of Googling and a bit of trial and error, I managed to get it working. (It works in Google Chrome, Mozilla Firefox, Internet Explorer 7, 8 and 9. However, the solution doesn't really work with Internet Explorer with different standards.)

Let's go through parts of the source codes first. The following liner will enforce your Internet Explorer 9 onwards to fall back and use Internet Explorer 8 standards. However, this will also caused all your Internet Explorer 9 codes to malfunction.
<meta http-equiv="X-UA-Compatible" content="IE=8" >
The following codes are meant for super old browsers that doesn't supports the css RGBa(3 primary colours and alpha).
/* Fallback for web browsers that doesn't support RGBa */
background: rgb(0, 0, 0) transparent;
The following codes are meant for super new browsers that supports the css RGBa(3 primary colours and alpha). (For example: latest Mozilla Firefox, Google Chrome, etc.)
/* RGBa with 0.7 opacity */
background: rgba(0, 0, 0, 0.7);
The following codes are meant for the older Internet Explorers. Would need to add the condition <!--[if lte IE 8]>, because browsers like Internet Explorer 9 will apply both filters and RGBa. =.=""
    <!--[if lte IE 8]>
        <style>
            #mainbg1 {
                /* For IE 5.5 - 7*/ filter:progid:DXImageTransform.Microsoft.gradient(startColorstr=#b2000000, endColorstr=#b2000000);
                /* For IE 8*/
                -ms-filter: "progid:DXImageTransform.Microsoft.gradient(startColorstr=#b2000000, endColorstr=#b2000000)";
            }
        </style>
    <![endif]-->
And here's all the source codes at one glance.
<!DOCTYPE html PUBLIC "-//W3C//DTD HTML 4.01 Transitional//EN" "https://www.w3.org/TR/html4/loose.dtd">
<html>
<head>
    <meta http-equiv="Content-Type" content="text/html; charset=utf-8">
    <meta http-equiv="X-UA-Compatible" content="IE=8" >
    <title>Test</title>
    <style type="text/css" media="screen"> 
        body{
            margin: 0px;
			background-color:#00FF00;
		}
        #mainbg {
            width:100%; 
			height:1000px; 
			text-align:center; 
			position:absolute;
        }
        #mainbg1 {
            width:500px;
            height:500px;
            margin: 0px auto;
	
            /* Fallback for web browsers that doesn't support RGBa */
            background: rgb(0, 0, 0) transparent;
            /* RGBa with 0.7 opacity */
            background: rgba(0, 0, 0, 0.7);
        }
    </style>
    <!--[if lte IE 8]>
        <style>
            #mainbg1 {
                /* For IE 5.5 - 7*/ filter:progid:DXImageTransform.Microsoft.gradient(startColorstr=#b2000000, endColorstr=#b2000000);
                /* For IE 8*/
                -ms-filter: "progid:DXImageTransform.Microsoft.gradient(startColorstr=#b2000000, endColorstr=#b2000000)";
            }
        </style>
    <![endif]-->
</head>
<body>
<div id="mainbg">
    <div id="mainbg1">
    </div>
</div>
</body>
</html>
* Click here for the demo shown in this post.
^ Click here for the source files for the demo.

Sunday, June 9, 2013

Haswell

Not sure if all of you had went down to the PC Show at Expo, but it seems that some of the latest gadgets were bundled with the latest 'Haswell' processor. And some of the bigger IT stores in Sim Lim are selling motherboard bundles that comes with the 'Haswell' processor too. So if you have been looking forward to the release of the 'Haswell' processor, I think that you probably want to make a trip down to Sim Lim Square or the PC Show (Today, June 9 2013, is the last day.) and take a look.

* Click here to find out more about the 'Haswell' processor.

Saturday, June 1, 2013

AS 3: Opening a url with utf-8 encode parameters

Not sure if any of you out there might encounter the following problem, but with all these social networking sites floating around the Internet, there might be a requirement that requires you to open up a website with some parameters. Therefore...

Here's the source code of my main application - SimpleTwitterPost.mxml
<?xml version="1.0" encoding="utf-8"?>
<s:Application xmlns:fx="http://ns.adobe.com/mxml/2009" 
      xmlns:s="library://ns.adobe.com/flex/spark" 
      xmlns:mx="library://ns.adobe.com/flex/mx"
      backgroundColor="#CDCDCD">
 
 <fx:Script>
  <![CDATA[
   //A default message.
   private var msg:String = "僕は男性です。";
   //URL of Twitter.
   private var strTwitter:String = "http://www.twitter.com";
   
   //Label
   private var strLabel:String = "Please enter your " +
    "message in the text box provided below."
   
   //Upon clicking on one of the buttons,
   protected function clickHandler(event:MouseEvent):void
   {
    var tempStr:String = txtInput.text;
    if(event.currentTarget == btn1)
    {
     //encode the message in utf-16,
     //which is not supported across most browsers.
     tempStr = escape(tempStr);
    }else{
     //encode the message in utf-8,
     //which is supported across all browsers.
     tempStr = encodeURIComponent(tempStr);
    }
    tempStr = strTwitter + "?status=" + tempStr;
    
    var tempURLReq:URLRequest;
    tempURLReq = new URLRequest(tempStr);
    
    //Open the URL in a new window.
    navigateToURL(tempURLReq, "_blank");
   }
  ]]>
 </fx:Script>
 <fx:Declarations>
  <!-- Place non-visual elements (e.g., services, value objects) here -->
 </fx:Declarations>
 <s:VGroup verticalAlign="middle" 
     horizontalAlign="center" 
     width="100%" 
     height="100%">
  <s:Spacer height="100%"/>
  <s:Label text="{strLabel}"/>
  <s:TextArea maxChars="140"  
     id="txtInput"
     heightInLines="4"
      width="50%" 
     text="{msg}"/>
  <s:Button label="Using escape()" 
      click="clickHandler(event)" 
      width="200"
      id="btn1"/>
  <s:Button label="Using encodeURIComponent()"
      click="clickHandler(event)"
      width="200"
      id="btn2"/>
  <s:Spacer height="100%"/>
 </s:VGroup>
</s:Application>
* Click here for the demo shown in this post.
^ Click here for the source files for the demo.